
Mit dem Proxmox-Port Projekt ist es möglich Proxmox 8 auf einem Raspberry Pi 4 (oder 5) zu installieren.
Nutze ich nicht produktiv, sondern nur in einer Testumgebung zum ausprobieren und rumspielen.
17.05.2024 - Anleitung aktualisiert, https://images.lxd.canonical.com/images/ wieder online
03.02.2024 - Anleitung aktualisiert, https://uk.lxd.images.canonical.com/images/ ist aktuell offline
26.12.2023 - Anleitung aktualisiert
mein Setup:
- Raspberry Pi 4 mit 8GB RAM
- Raspberry Pi Debian Image (64bit, 20231109_raspi_4_bookworm.img.xz – kein Raspberry Pi OS)
- 80GB SSD mit USB-Adapter für Proxmox
- 500GB SSD mit USB-Adapter für Storage (optional)
Installation
Dazu nutze ich eins der aktuellen tested Raspberry Pi Debian Images. (https://raspi.debian.net/tested/20231109_raspi_4_bookworm.img.xz)
Mit dem Raspberry Pi Imager auf die SSD schreiben und booten. Login als root ohne Passwort.
System updaten und einige Pakete installieren.
apt update
apt upgrade -y
apt install -y wget curl htop lsof ethtool ifupdown2
reboot
Deutsche Tastatur.
apt install -y keyboard-configuration
apt install -y console-setup
SSH für root aktivieren.
In der /etc/ssh/sshd_config den PermitRootLogin Eintrag ändern.
PermitRootLogin yes
SSH Service neu starten.
systemctl restart sshd
Root Passwort setzen.
passwd
Netzwerk konfigurieren. (der Pi bleibt auf DHCP stehen)
# /etc/hosts
127.0.0.1       localhost.localdomain localhost
192.168.50.170  pimox.bachmann.lan pimox

# /etc/hostname
pimox

# IPv6 auf den Pi deaktivieren (optional)
echo "net.ipv6.conf.all.disable_ipv6 = 1" >> /etc/sysctl.conf

# reboot
reboot
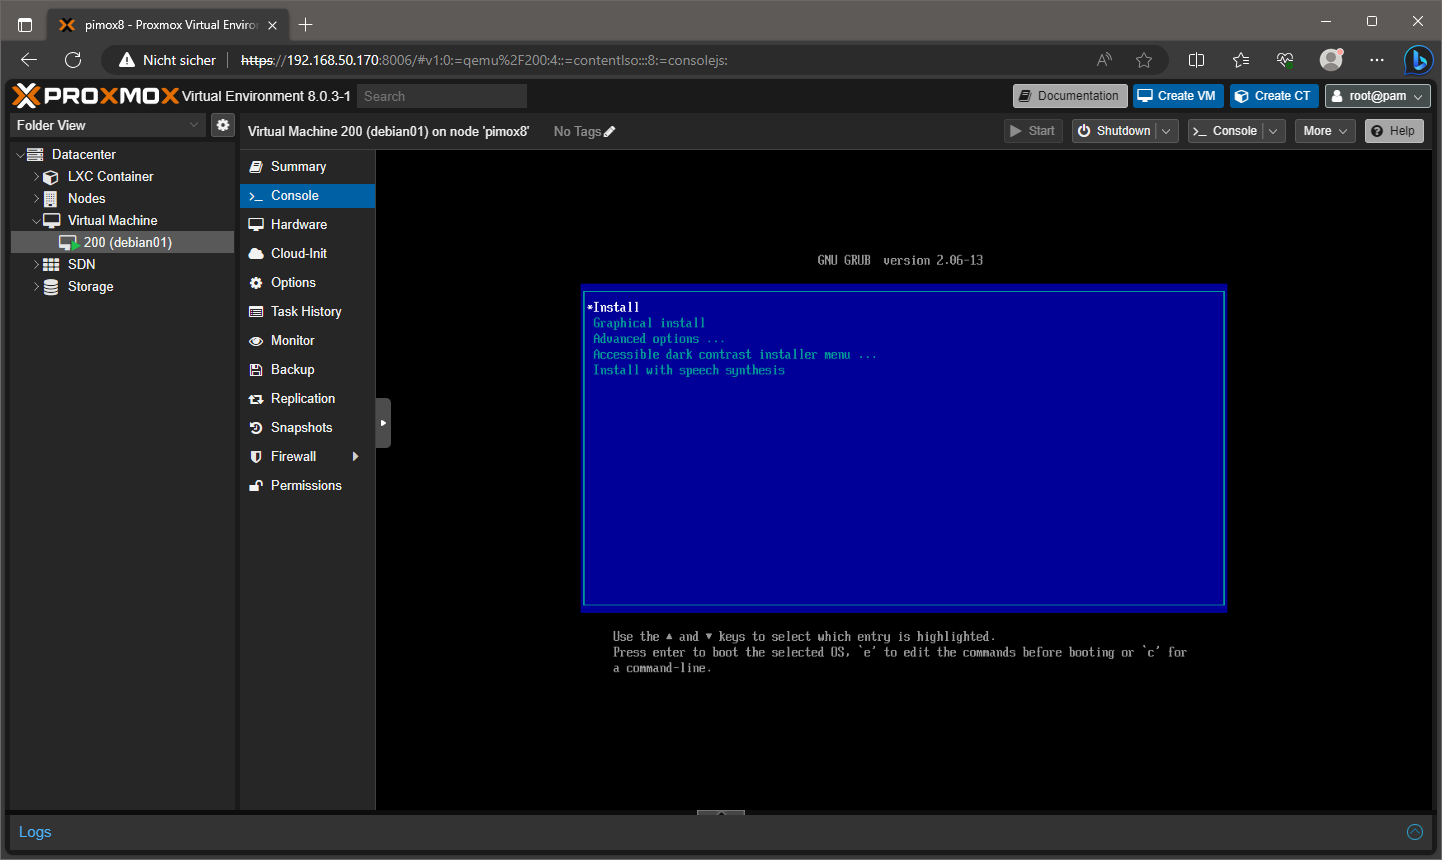
Proxmox 8 installieren (siehe Proxmox-Arm Wiki)
# Proxmox VE Repository key hinzufügen
curl https://global.mirrors.apqa.cn/proxmox/debian/pveport.gpg -o /etc/apt/trusted.gpg.d/pveport.gpg

# Proxmox 8 VE Repository hinzufügen
echo "deb https://global.mirrors.apqa.cn/proxmox/debian/pve bookworm port" > /etc/apt/sources.list.d/pveport.list

# Repository und System updaten
apt update && apt full-upgrade

# Proxmox VE Pakete installieren
apt install proxmox-ve postfix open-iscsi
reboot
Bei der Postfix Konfiguration wähle ich Satellite system, da ich einen lokalen Mailserver habe. Sonst einfach Local only für keine Mailzustellung.
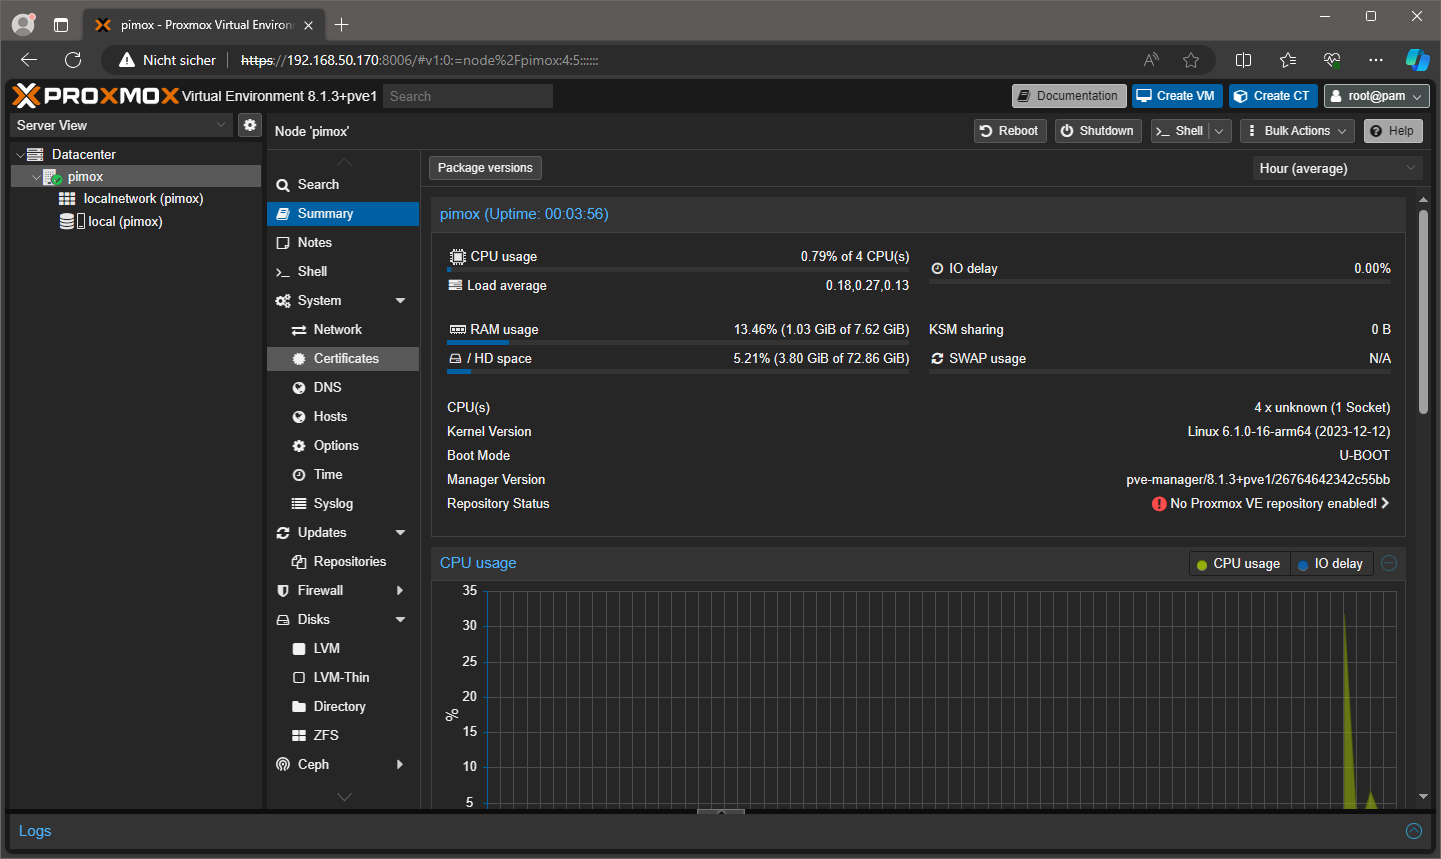
Proxmox 8 läuft! :-)
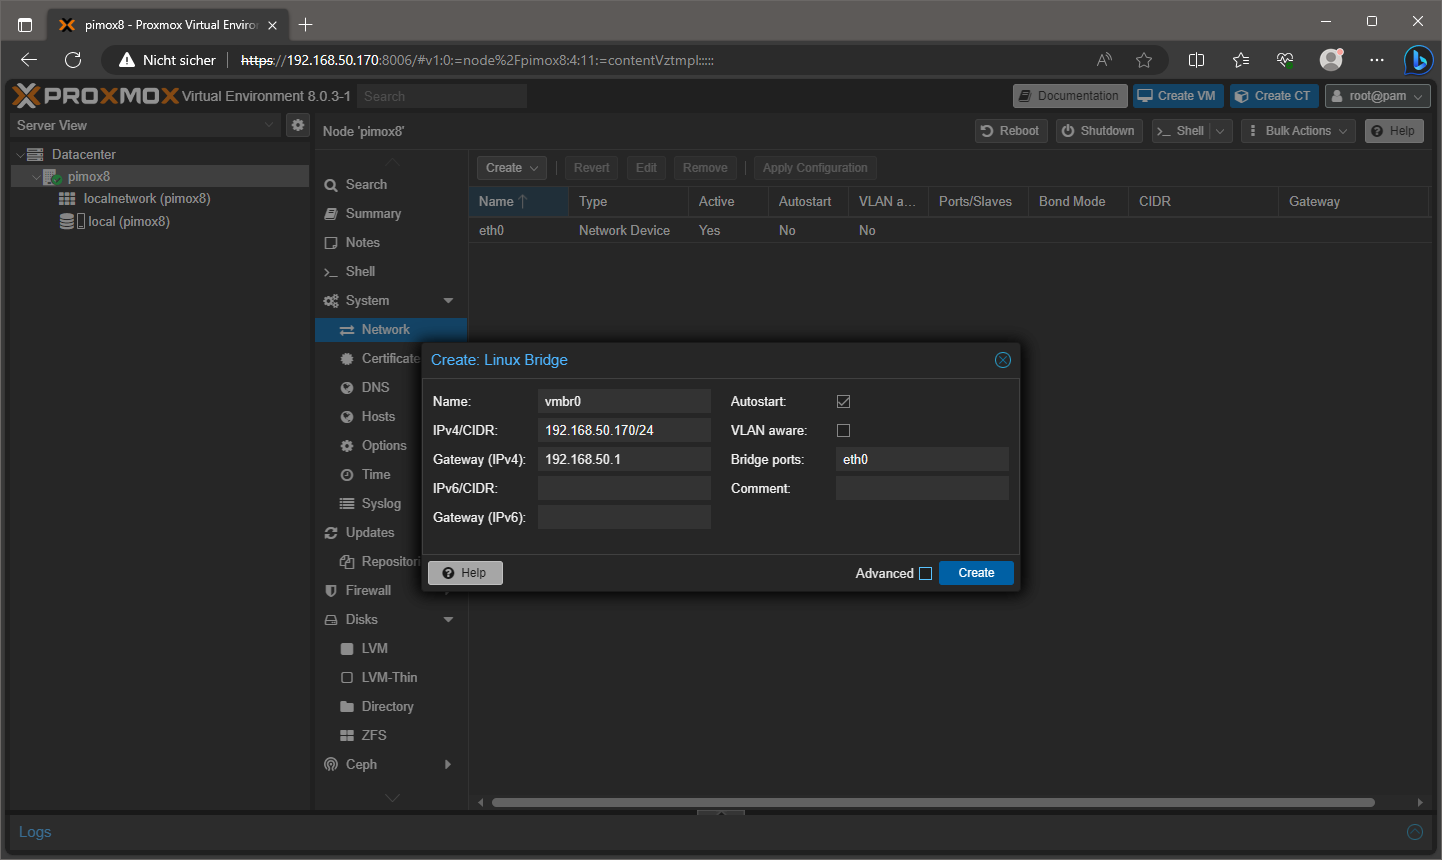
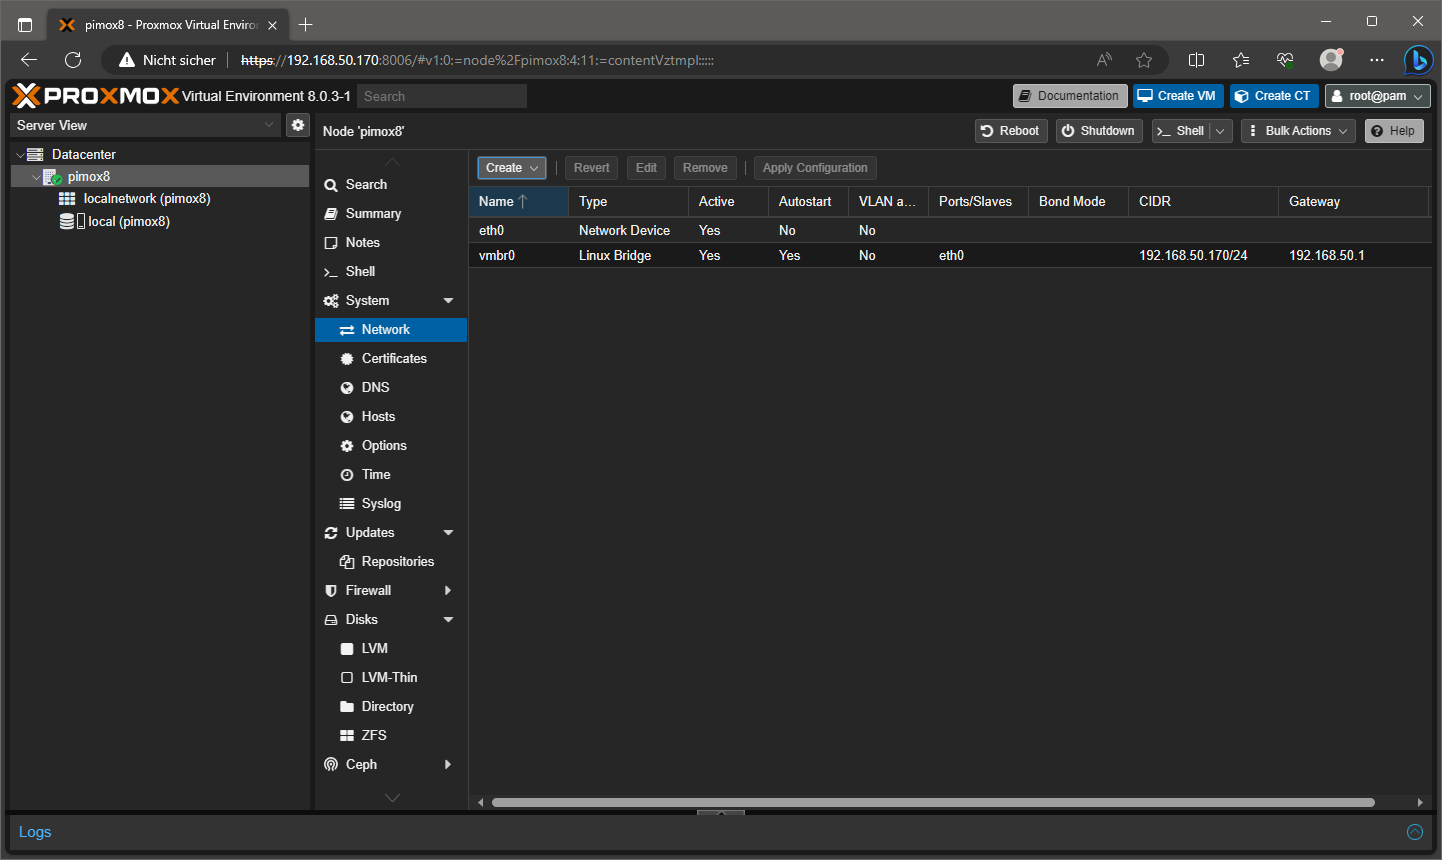
vmbr0 Bridge erstellen
Nach der Installation war keine Linux Bridge vorhanden. Neue Linux Bridge erstellen und das System danach nochmal neu starten.
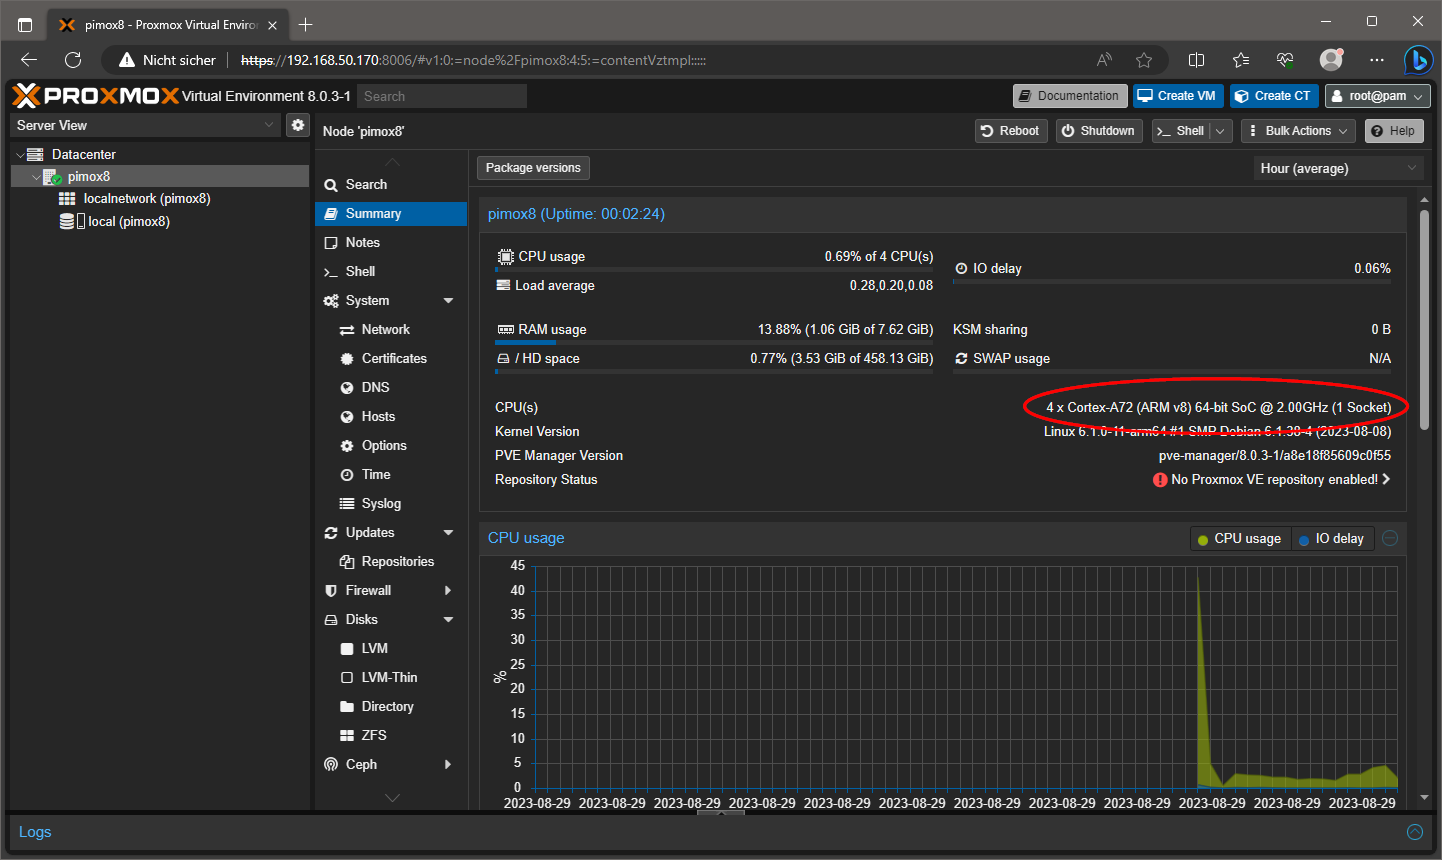
CPU Info patchen
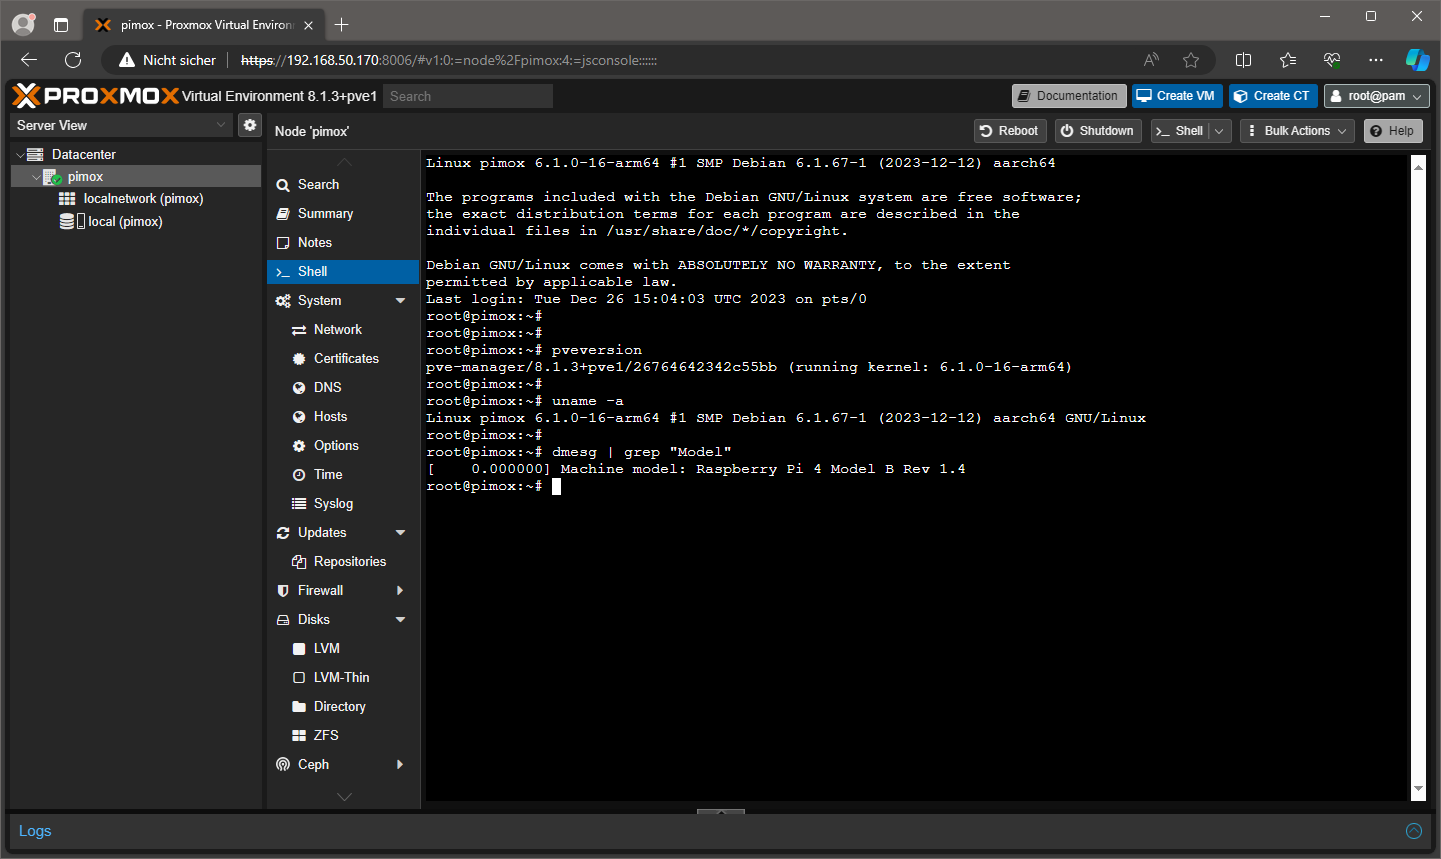
Die CPU Erkennung auf dem Raspberry Pi 4 gibt nur ein “unknown” aus. Kleiner Schönheitsfehler. ;)
In der /usr/share/javascript/proxmox-widget-toolkit/proxmoxlib.js kann das CPU Model einfach fest verdratet werden.
render_cpu_model: function(cpu) {
    let socketText = cpu.sockets > 1 ? gettext('Sockets') : gettext('Socket');
    //return `${cpu.cpus} x ${cpu.model} (${cpu.sockets.toString()} ${socketText})`;
    return `${cpu.cpus} x Cortex-A72 (ARM v8) 64-bit SoC @ 2.00GHz (${cpu.sockets.toString()} ${socketText})`;
},
Browser neu laden (SHIFT + reload) und die CPU Anzeige sollte sich jetzt geändert haben.
CT erstellen
Die ARM64 Images hole ich mir von https://images.lxd.canonical.com/images/. (Alternative https://jenkins.linuxcontainers.org/)
Das rootfs.tar.xz der gewünschten Distribution (arm64) einfach ins Verzeichnis der Container Templates herunterladen, umbenennen und fertig.
# Template Verzeichnis
cd /var/lib/vz/templates/cache

# Debian 12 (Bookworm)
curl https://uk.lxd.images.canonical.com/images/debian/bookworm/arm64/default/20230830_05:24/rootfs.tar.xz -o debian-12.1-default_arm64_2023.08.30.tar.xz
Die Debian Images haben alle Probleme mit der IP Konfiguration. (systemd-networkd.service)
unable to open file '/etc/network/interfaces.tmp.3553' - No such file or directory
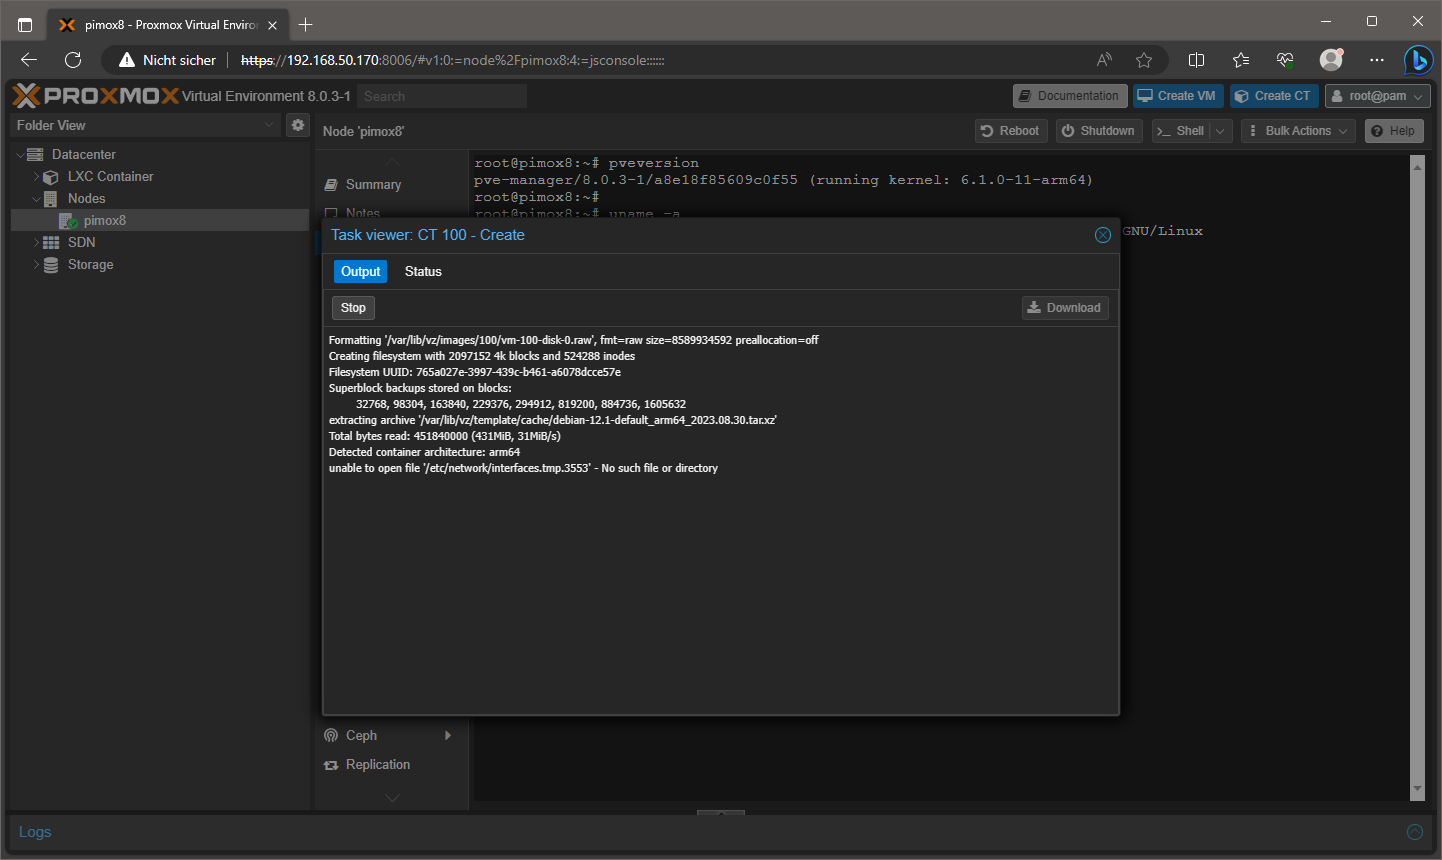
Der CT kann nur erstellt werden, wenn man IPv4: Static wählt und einfach KEINE IP einträgt!
Mit dem Befehl dhclient erhält der CT dann dennoch eine IP vom DHCP Server.

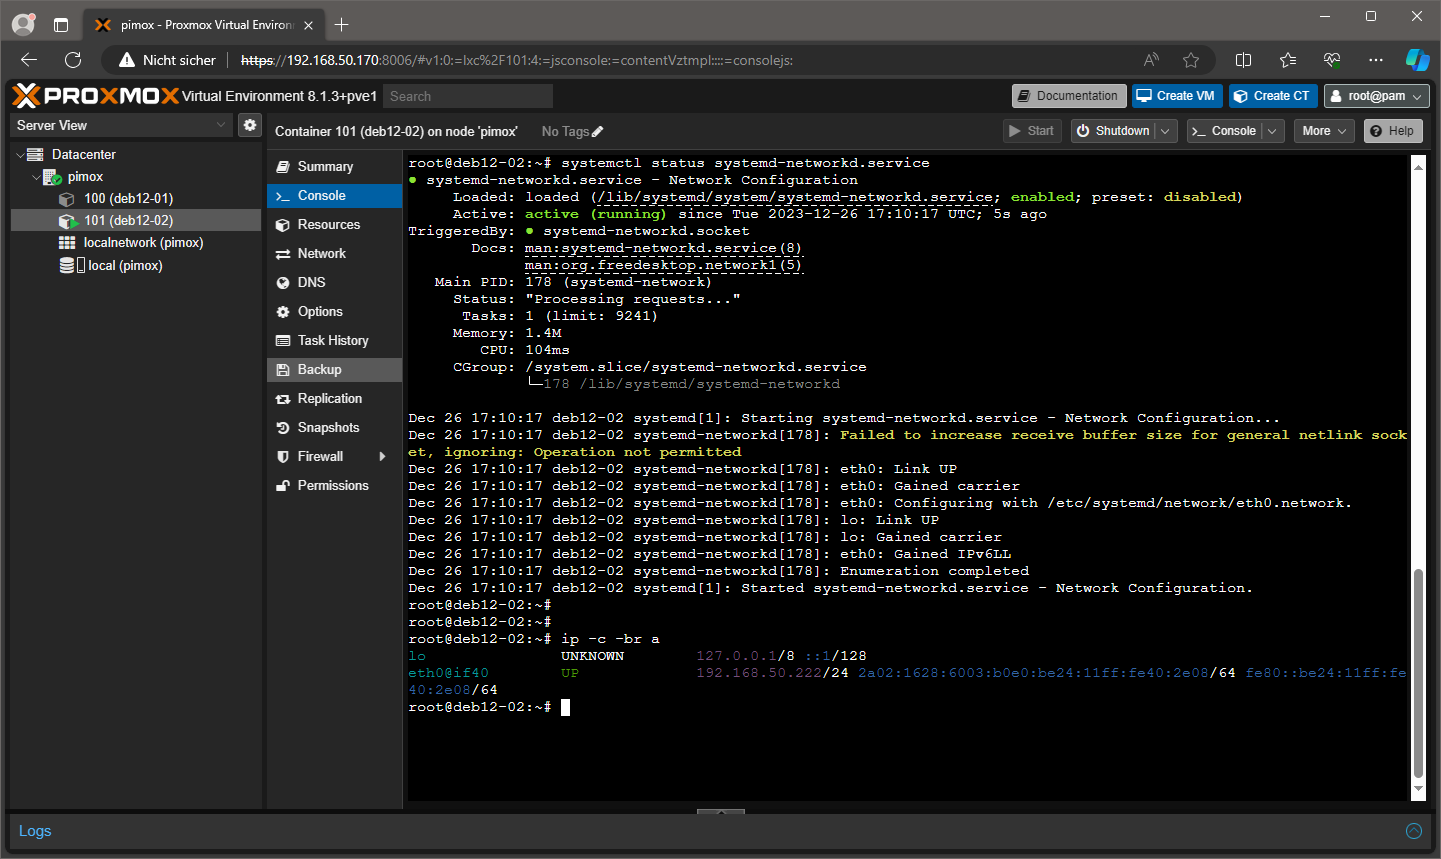
Für eine statische IP, in der Datei /etc/systemd/network/eth0.network (Proxmox Forum)
# ändern von
[Network]
DHCP=true

# auf
[Network]
Address=192.168.50.222/24
Gateway=192.168.50.1
Den system-networkd Service aktivieren.
systemctl enable systemd-networkd.service
CT neu starten, statische IP sollte jetzt erhalten bleiben.
Alpine, Arch und Ubuntu Images machen keine Probleme.
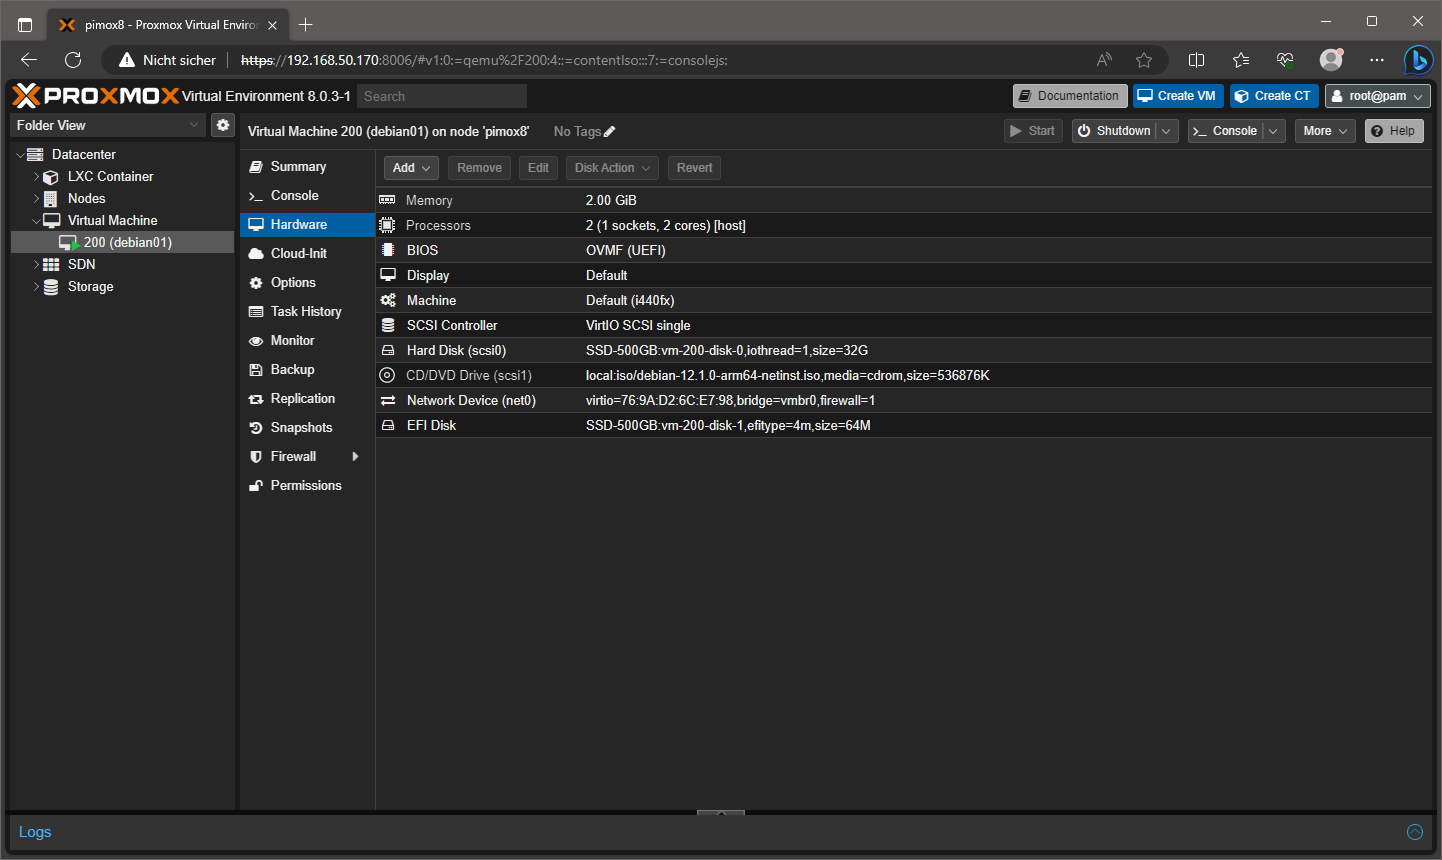
VM erstellen
Debian 12 Bookworm – debian-12.x.y-arm64-netinst.iso
Mit den Standardwerten startet die VM nicht. Angepasst werden musste:
- CD/DVD Drive: scsi
- CPU: host
- BIOS: ovmf
- EFI Disk: hinzufügen
- BOOT ORDER: 1st cd, 2nd hdd
Erst mit den obigen Einstellungen startete die VM und konnte installiert werden.
Updates
Hier ist man auf den Entwickler angewiesen.
Super hilfreich es hat alles geklappt, besten Dank!
Lediglich ifupdown2 hatte Probleme gemacht, nach einer Installation blieb das Gerät immer im Reboot hängen. Daher muss ich wohl drauf verzichten, bei einem Privatsystem jedoch kein Problem.
Mich würde noch interessieren ob Debian + Proxmox Ressourcenfressender ist als der eigentliche BareMetal Installer von Proxmox direkt. Der ist ja leider nicht mit dem Raspi Imager kompatibel aber wäre trotzdem interessant zu wissen.
Du kannst die ISO zusammen mit dem Raspberry PI UEFI auf eine Platte flashen und dann den normalen Installer nutzen ;-)
Wie genau das funktioniert ist hier beschrieben: https://forums.raspberrypi.com/viewtopic.php?t=282839
Am Einfachsten ist es mit Rufus, wird im Initialen Beitrag relativ zum Schluss beschrieben
Sprichst du von der normalen Proxmox VE 8.1 ISO Installer ISO, oder von der angepassten ISO von https://github.com/jiangcuo?
Falls noch jemand mal Probleme mit der Anzeige des RAMs und SWAPs in der Übersicht von LXC Container hat. Hier ist ein Workaround: https://github.com/jiangcuo/Proxmox-Arm64/issues/51
# Sollte der OpenSSH Server nicht installiert sein:
apt install openssh-serverSoll ein login per root erlaubt sein, muss dieser Eintrag in die /etc/ssh/sshd_config
PermitRootLogin yesDen openssh-server neu starten:
systemctl restart sshd# Die Tastatur auf Deutsch umstellen:
apt install localesund noch ggf. ein:
dpkg-reconfigure localesde_DE.UTF-8 UTF-8 auswählen
Beim Schritt “# Repository und System updaten” erhalte ich folgende Fehlermeldung (All packages are up to date.):
W: Skipping acquire of configured file ‘port/binary-armhf/Packages’ as repository ‘https://global.mirrors.apqa.cn/proxmox/debian/pve bookworm InRelease’ does not seem to provide it (sources.list entry misspelt?)
E: Could not open lock file /var/lib/dpkg/lock-frontend – open (13: Permission denied)
E: Unable to acquire the dpkg frontend lock (/var/lib/dpkg/lock-frontend), are you root?
Weiß jemand Rat?
Kann es sein, daß das repository ‘https://global.mirrors.apqa.cn/proxmox/debian/pve bookworm InRelease’ nicht mehr stimmt?
Danke im Voraus und viele Grüße
Da les ich was von armhf.
Was gibt denn uname -m bei dir aus?
Sollte so aussehen:
root@pimox8:~# uname -maarch64
echo “deb [arch=arm64] https://global.mirrors.apqa.cn/proxmox/debian/pve bookworm port” > /etc/apt/sources.list.d/pveport.list
This should fix the search to armhf
Regards
Bea
deb [arch=arm64] https://mirrors.apqa.cn/proxmox/debian/pve bookworm port
worked for me
apt update works fine now
This should be:
deb [arch=arm64] https://global.mirrors.apqa.cn/proxmox/debian/pve bookworm port
Note the “arch=arm64” not “arch-arm64”
Danke für die Anleitung. Ich wollte das Proxmox VE 8 auf dem Raspberry Pi 4B mit frischem Debian Bookworm installieren, bekomme beim Ausführen von apt update folgende Meldung angezeigt:
W: Skipping acquire of configured file ‘port/binary-armhf/Packages’ as repository ‘https://global.mirrors.apqa.cn/proxmox/debian/pve bookworm InRelease’ does not seem to provide it (sources.list entry misspelt?)
Es sieht so aus, als ob er die Ressourcen nicht finden kann. Hat jemand eine Idee oder den Fehler sogar auch schon gehabt?
Da les ich was von armhf.
Was gibt denn uname -m bei dir aus?
Sollte so aussehen:
root@pimox8:~# uname -maarch64
Den Fehler hab ich auch beim Installieren per Repo gehabt. Allerdings ist die Installation trotzdem erfolgreich durchgelaufen und Proxmox läuft. Das kann daher eigentlich ignoriert werden
Ist diese “Anleitung” ungeprüfter, KI generierter Kram? Proxmox gibt es doch überhaupt noch nicht offiziell für ARM und damit auch nicht für den Raspberry Pi. Deshalb können die beiden Poster oben lange versuchen Proxmox zu installieren… aarch64 gibt es schlicht nicht in den offiziellen Repos, weil ARM eben nicht unterstützt wird. Mit Pimox kann man etwas rumspielen mit v7, aber sehr performant ist das nicht.
Stimmt, ARM wird offiziell nicht unterstützt. Mit dem Proxmox-Port lässt es sich PVE 8 aber problemlos auf dem PI installieren.
Die Anleitung ist von mir, funktioniert einwandfrei und wurde nicht von einer KI generiert. (so ein Quatsch)
Hallo,
Eine Frage: Ist es möglich einen normalen AMD LXC Container auf einem Raspi zum Laufen zu bringen?
VG HARDY
Nein, nur ARM Container und VMs.
Laufe bei der Installation unter Raspian Lite Bookworm Stable immer auf Problem mit dpkg und kann Proxmox V8 nicht auf den Pi4 installieren
(egal ob Option Y oder N):
Configuration file ‘/etc/apt/sources.list.d/pveport.list’
==> File on system created by you or by a script.
==> File also in package provided by package maintainer.
What would you like to do about it ? Your options are:
Y or I : install the package maintainer’s version
N or O : keep your currently-installed version
D : show the differences between the versions
Z : start a shell to examine the situation
The default action is to keep your current version.
*** pveport.list (Y/I/N/O/D/Z) [default=N] ? Y
Installing new version of config file /etc/apt/sources.list.d/pveport.list …
Undefined subroutine &PVE::Syscall::SYS_mknod called at /usr/share/perl5/PVE/Sys call.pm line 11.
BEGIN failed–compilation aborted at /usr/share/perl5/PVE/Syscall.pm line 81.
— SNIP —
Hast du ein Raspian PI OS installiert?
Im Wiki steht: Install a standard Debian bullseye.
Vielleicht liegt es daran?
Es geht hier um Debian 12 Bookworm! Die Rasbian Lite 64 ist auch ok. Die Version des Paket Managers über nehmen…
Hi, I installed Proxmox Arm64 in Pi 5 according your instructions, every run smoothly but when I try to logged in, the root password is not recognized, in fact it was not requested in the installation. Can someone help me? thanks
You have to set a root password.
Hi Guys,
Question 1: Has somebody tried to use ksmtuned with JiungCuo‘s Proxmox 8 port ?
apt install ksmtuned
Question 2: the chrony package is installed on Proxmox for amd64, has somebody tried with chrony and do replace systemd_timesystem ?
apt install chrony
Question 3: Raspi bookworm images comes with ifupdown 2, i‘m facing issues while installing ifupdown2 package.
Steps I used: when got.key and repository is in place.
– change /etc/hosts to my needed static address
– install Proxmox with the following commands
apt install ifupdown2 open-iscsi ksmtuned chrony proxmox-ve
do NOT reboot before /etc/network/interfaces ist setup properly. I do this manually or directly via
http://:8006
Question 4:
I‘m facing VLAN aware issue while activating that function on RPi4 with the default kernel (kernel on Raspi.Debian.net) hasn‘t that issue.
Question 5:
Has somebody used the pve-kernel compiled on Raspi 4 or 5 ?
Regards
Bea
Hello,
on my Raspberry Pi 5 8GB, the guide works as well, except for one issue – the Wi-Fi.
OS: Raspberry Pi OS Lite 64-bit
After the commands:
# Install Proxmox VE packages
apt install proxmox-ve postfix open-iscsi
I can initially access the web interface via Wi-Fi, but after a reboot, Wi-Fi is no longer available, as if the driver is corrupted.
Do you have any ideas on how to reinstall the driver?
Cheers
Arne
PS: Please refrain from advising that Wi-Fi is not recommended in such environments.
Sorry, I have no idea. :(
https://pve.proxmox.com/wiki/WLAN
Funktioniert es nur über LAN ?
ich habe IP=192.168.178.68 in /etc/hosts gesetzt. Hatte aber keine WLAN Verbindung. Dann habe ich LAN Kabel verbunden. Dann wurde eine Verbindung mit 192.168.178.32 hergestellt.
Vor der pimox Installation funktionierte aber WLAN.
Könnte sein das es funktioniert, musst du aber händisch einrichten. Google mal danach … ;)
https://pve.proxmox.com/wiki/WLAN
Hallo zusammen. Also ich habe aktuell einen Raspi 5 bei mir unter den Fingern. Ich habe das ganze hier mal mitgelesen, aber werde nicht so richtig schlau daraus. Kann man Proxmox 8 auf dem Raspi5 (mit Bookworm) installieren oder doch nicht ;-)
Die Anleitung ist für den Pi4, sollte aber auch auf dem Pi5 laufen.
Es wäre nett die Fehler die in den Kommentaren angegeben wurden, auch in der Anleitung zu übernehmen. Der apt list Eintrag funktioniert zb nicht. In einem anderen Beitrag hatte ich sie noch gelobt und jetzt kommt Kritik.
Ich kann auch Kritik vertragen. ;)
Frohe Weihnachten.
Also das Proxmox läuft auch mit der Installation auf dem Raspi5. Ich habe auch einen LXC Container erstellen können (debian 10 / Buster)
Jetzt wollte ich auf die gleiche weise das Template für Debian Bullseye oder Debian Bookworm installieren, aber ich bekomme immer wieder diese Fehlermeldung.
Ich habe auch das Rep. aus der Anleitung genommen… keine Besserung… das hier ist die Fehlermeldung: (die Datei habe ich nur umbenannt)
32768, 98304, 163840, 229376, 294912, 819200, 884736, 1605632
extracting archive ‘/var/lib/vz/template/cache/debian-bookworm-12.1-default_arm64_2023.08.30.tar.xz’
Total bytes read: 451840000 (431MiB, 67MiB/s)
Detected container architecture: arm64
unable to open file ‘/etc/network/interfaces.tmp.1942’ – No such file or directory
TASK ERROR: unable to create CT 101 – error in setup task PVE::LXC::Setup::post_create_hook
Hab den Abschnitt CT erstellen aktualisiert.
Was mir aufgefallen ist, in der Anleitung wurde ja geschrieben:
Die Debian Images haben alle Probleme mit der IP Konfiguration. Der CT kann nur erstellt werden, wenn ich Static IP wähle und einfach keine Eintrage.
Ich konnte einen CT mit “Debian / Buster” ohne Probleme erstellen, inkl. ip Vergabe… Bei Debian “Bullseye oder Bookworm” geht nichts. Wenn man die IP beim erstellen des CT wird dieser zwar erstellt, aber man kann die IP auch später nicht anpassen im Proxmox. Wenn man das versucht, wird der CT nicht gestartet..
Und wenn ich einen CT mit “Debian Bullseye oder Bookworm” installieren möchte, und gleich eine statische IP vergebe , kommt bei der Installation dieser Fehler im Log:
unable to open file ‘/etc/network/interfaces.tmp.3311’ – No such file or directory
TASK ERROR: unable to create CT 101 – error in setup task PVE::LXC::Setup::post_create_hook
Kann man das iwie fixen ?
Hab den Abschnitt CT erstellen aktualisiert.
Hi all
ich habe zwar proxmox 7 auf dem PI4 installiert und danach ein VM erzeugt mit debian 12 – läuft soweit alles :-)
ich muss aber ein usb device durchreichen – eingestellt habe ich host=1-1.4 – die vm läuft auch an – aber in der vm wird leider der usb nicht angezeigt?
kann einer der Experten hier mit vielleicht weiterhelfen
besten dank
Vielleicht noch ein paar Zwischeninfos
Proxmox:
/: Bus 01.Port 1: Dev 1, Class=root_hub, Driver=xhci_hcd/1p, 480M
|__ Port 1: Dev 2, If 0, Class=Hub, Driver=hub/4p, 480M
|__ Port 4: Dev 3, If 0, Class=Vendor Specific Class, Driver=pl2303, 12M
vm: minimal Installation
/: Bus 01.Port 1: Dev 1, Class=root_hub, Driver=ehci-pci/6p, 480M
|__ Port 1: Dev 2, If 0, Class=Human Interface Device, Driver=usbhid, 480M
|__ Port 2: Dev 3, If 0, Class=Human Interface Device, Driver=usbhid, 480M
leider entspricht die Grafik nicht Realität – Port4 steht unter Port1 – also 1.4
Ich hatte das gleiche Problem mit dem ioBroker als VM. Ich wollte einen ConBee II USB-Stick (ZigBee Bridge) transparent in die VM rinreichen und das normal Passthrough hat nicht funktioniert.
Hilfe hat dann der folgende Artikel gebracht: https://forum.proxmox.com/threads/passthrough-problem-with-conbee-2-on-pimox.107447/
Du musst dafür direkt die Konfig-Datei der VM anpassen. Vielleicht hilft dir der Artikel ja weiter.
—
Gruß
Uwe.
kann ich das als grundlage für eine installation auf raspi5 nehmen? gibt noch nichts dazu soweit ich seh :-/
Denke schon, probier es einfach mal aus.
Bei mir läuft “apt update” mit der folgenden Warning, hat jemand eine Idee was ich tun kann um sie loszuwerden?..
N: Skipping acquire of configured file ‘pve-no-subscription/binary-armhf/Packages’ as repository ‘http://download.proxmox.com/debian/pve bookworm InRelease’ doesn’t support architecture ‘armhf’
N: Skipping acquire of configured file ‘pve-no-subscription/binary-arm64/Packages’ as repository ‘http://download.proxmox.com/debian/pve bookworm InRelease’ doesn’t support architecture ‘arm64’
W: Skipping acquire of configured file ‘port/binary-armhf/Packages’ as repository ‘https://global.mirrors.apqa.cn/proxmox/debian/pve bookworm InRelease’ does not seem to provide it (sources.list entry misspelt?)
Hast du die pve-no-subscription in die /etc/apt/source.list eingetragen?
Die darf da nicht rein.
Der Host mit den images ist anscheinend weg …
0curl: (6) Could not resolve host: uk.lxd.images.canonical.com
-bash: https://uk.lxd.images.canonical.com/images/: Datei oder Verzeichnis nicht gefunden
Weiss jemand, wo das jetzt liegt?
Der Pfad lokal lautet bei mir übrigens /var/lib/vz/template/cache/ statt /var/lib/vz/templates/cache/
Vielen Dank!
Eventuell hier. (nicht getestet)
https://jenkins.linuxcontainers.org/
Die Anleitung funktioniert nicht mehr, bzw. das verlinkte Image enthält nicht die nötigen Netzwerktreiber für die beim Raspberry Pi verbauten Netzwerkchips.
Was für ein verlinktes Image?
Meinst du das: https://raspi.debian.net/tested/20231109_raspi_4_bookworm.img.xz ?
Ich habe den Fehler gefunden, der Switch Port war falsch konfiguriert.
Proxmox läuft nun, allerdings habe ich nun ein neues Problem.
Ich nutze das Original POE HAT, welches einen PWM Lüfter hat, der wird aber nicht angesteuert was dazu führt das der Raspberry Pi 4 sehr heiss wird.
Weis jemand wie man die Lüfter zum laufen bekommt?
Bei mir ist ZFS nicht verfügbar. Wie kann ich das nachinstallieren? (apt install zfs-dkms fktn nicht – E: Unable to locate package zfs-dkms) Jemand n Tipp.
VG Hardy
Hab die sources.list bearbeitet – dann gings…
was musstest du eintragen für ZFS?
Danke für die sehr gute Anleitung.
Bei mir ist allerdings folgendes Problem aufgetreten:
Unter Hardware/Maschinentyp gibt es kein i440fx zur Auswahl, auch habe ich schon versucht zu updaten. Ohne Erfolg, da es keine weitere Updates gibt.
Meine Version von Proxmox ist aktuell: 8.1.7 und ich verwende Proxmox auf einen Raspberry Pi Module 4 mit einem Gehäuse von Waveshare “CM4-DUAL-ETH-BOX-A-EU”
Evtl. hilfen auch folgende Angaben:
—————————————————
root@pimox:~# dpkg -l | grep qemu
ii libproxmox-backup-qemu0 1.4.0 arm64 Proxmox Backup Server client library for QEMU
ii pve-qemu-kvm 8.1.5-4 arm64 Full virtualization on x86 hardware
ii qemu-server 8.1.1+port2 arm64 Qemu Server Tools
mit folgenden Befehl “qemu-system-x86_64 -machine ?” wird mir auch folgendes aufgelistet
root@pimox:~# qemu-system-x86_64 -machine ?
Supported machines are:
microvm microvm (i386)
pc Standard PC (i440FX + PIIX, 1996) (alias of pc-i440fx-8.1)
pc-i440fx-8.1 Standard PC (i440FX + PIIX, 1996) (default)
pc-i440fx-8.0 Standard PC (i440FX + PIIX, 1996)
— SNIP —
pc-i440fx-1.4 Standard PC (i440FX + PIIX, 1996) (deprecated)
q35 Standard PC (Q35 + ICH9, 2009) (alias of pc-q35-8.1)
pc-q35-8.1 Standard PC (Q35 + ICH9, 2009)
— SNIP —
pc-q35-2.10 Standard PC (Q35 + ICH9, 2009)
isapc ISA-only PC
none empty machine
Gruß Falcon
Ist bei mir auch so.
Zur Auswahl gibt es nur: Default (virt) und q35
Hej,
das mit den CPU Daten überschreiben klappt bei mir nicht. Ich füge die Zeile genauso ein, starte neu und habe trotzdem 4x unknown (1 Socket) in der Summary stehen.
Dann hast du vielleicht die originale Zeile nicht ausdokumentiert?
render_cpu_model: function(cpu) {
let socketText = cpu.sockets > 1 ? gettext(‘Sockets’) : gettext(‘Socket’);
return `${cpu.cpus} x Cortex-A76 (ARM v8) 64-bit SoC @ 2.40GHz (${cpu.sockets.toString()} ${socketText})`;
//return `${cpu.cpus} x ${cpu.model} (${cpu.sockets.toString()} ${socketText})`;
},
So sieht das aus bei mir aber zeigt unknown an im Web
Alles richtig. Browsercache löschen!
All packages are up to date.
W: Skipping acquire of configured file ‘port/binary-armhf/Packages’ as repository ‘https://global.mirrors.apqa.cn/proxmox/debian/pve bookworm InRelease’ does not seem to provide it (sources.list entry misspelt?)
kommt auch als Warnung bei apt update?
Schau mal in den Kommentaren, da gibt es eine Lösung.
Alles funktioniert. Die Sache mit den statischen IP ist eine ärgerliche Bagatelle. Ich habe es einfach auf DHCP gestellt, denn die statische IP vergibt bei mir sowieso der Router. Als Container-Template hatte ich mir mal ein jammy LTS abgespeichert. Das aber nur für spezielle Sachen, ansonsten bin ich der begeisterte “runtipi”-Nutzer. Einfacher gehts kaum noch.
https://runtipi.io/
Runtipi muss ich mal probieren!
https://images.lxd.canonical.com/images/
Dort sind die Images wieder da.
Die haben die Domain geändert.
Danke für die Info!
Artikel wurde aktualisiert.
Gibt es schon Erfahrung mit OS auf NVME Drive über USB angeschlossen?
Wenn ich auf SD Card installiere klappt alles. Bei NVME bleibt er nach der Aktualisierung aller Pakete beim Reboot hängen und nichts geht mehr.
Mir genauso passiert. Bisher keine Lösung gefunden.